


NexiGo N960E Pro, 1080P 60FPS Webcam with Light, Software Included, Fast AutoFocus, Built-in Privacy Cover, USB-C & USB-A Ports, 3.5mm Audio Jack, for Zoom Meeting Skype Teams Twitch
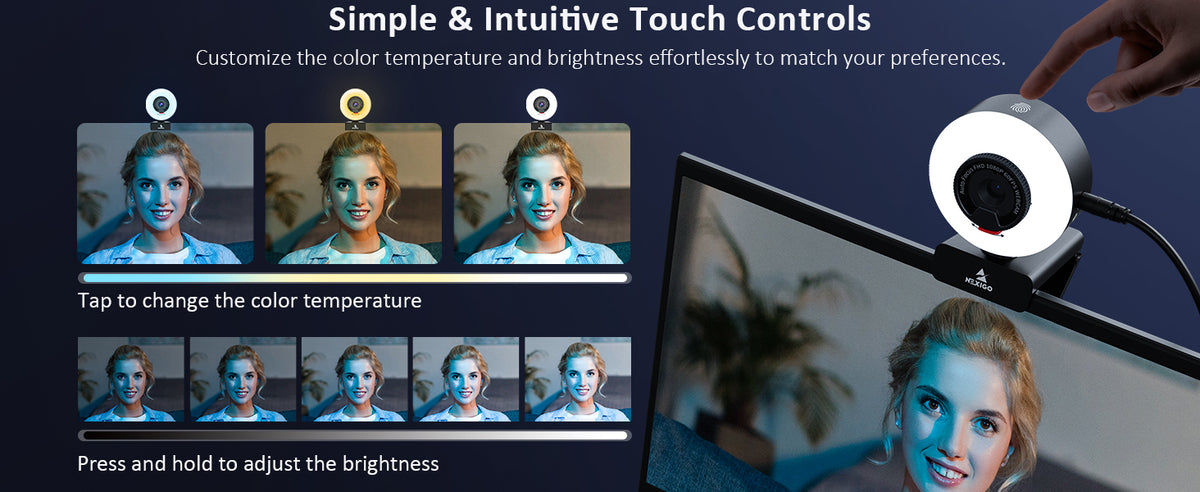
【Three-Level Adjustable Ring Fill Light】The built-in ring light provides 3-light Modes (with simple touch) and stepless adjustable brightness (with touch and press). You can achieve your ideal brightness level by touching and holding the ring light in dim light environments. Brighter than many other webcams with built-in lights, the light has a soft tone so that it doesn't create a glare.
【60FPS 1080p Webcam with Auto Focus】The NexiGo FHD Webcam comes with high definition 1920 x 1080p resolution at up to 60 frames per second (fps) refresh rate, and our enhanced autofocus helps to capture videos that are as accurate and true-to-life as possible.
【Webcam with Additional Interface】The NexiGo N960E Pro has two USB ports (Type-A and Type-C), making it more functional than its predecessor. These passthrough ports allow for a wider range of equipment compatibility, allowing you to connect the webcam to your computer and other USB devices such as microphones or cooling fans. It also features a 3.5mm audio jack for wired connection to speakers or headsets, even if your system lacks a headphone jack.
【Built-in Microphone】The built-in microphone with noise-canceling technology reduces ambient noise to enhance the sound quality of your video. Even in noisy surroundings, you can capture just the sounds that you want.
【Widely Compatible】The NexiGo webcam is compatible with multiple operating systems. The webcam is compatible with Windows XP/7/8/10/11, Mac OS 10.6 or higher, Linux 2.6.24 or higher, Chrome OS 29.0.1547 or higher, and Ubuntu Version 10.04 or higher.
Support
Go get further supportStep 1. Press and hold the Signal button on the far left side of the speakerphone for two seconds to begin pairing.

Step 2. Enable Bluetooth on your computer or mobile device and select "NexiGo SPK03" from the list of available devices. The speakerphone will say "Bluetooth connected" when pairing is complete.
After connecting the speakerphone to your phone, you can answer an incoming call by tapping the Phone button on the far right side of the speakerphone once. To reject an incoming call, press and hold the Phone button for 2 seconds. During a call, you can end it by tapping the Phone button once.
1. Please make sure it's properly connected to your computer by checking that the cables are securely plugged in and the speakerphone is turned on. If you're connecting via Bluetooth, try keeping the speakerphone within about 32.8 feet of your computer and has at least 30% battery for a stable connection.
2. Check your computer's audio settings. Make sure that your computer is set to use the speakerphone as its audio output device.
Note: If you experience issues getting your system to recognize the speakerphone, please try the following steps depending on your device’s operating system (Windows or Mac).
For Windows
Go to Settings > Privacy > Microphone, then turn on "Allow apps to access your microphone".
Select the apps on the list that you want to have access to the microphone.
Once you have access, open the apps you’re planning to use and ensure that you have selected the NexiGo SPK03 as the active speaker and active microphone from the list of available options.
For macOS
Go to the Apple menu > System Preferences > Security & Privacy, and select the Privacy tab. Select Microphone from the list of options on the left side of the page.
Select the apps you want to enable microphone access for. Click the box next to the app's name to enable microphone access for that application.
3. Open the app you want to use with the speakerphone. You may need to select your speakerphone (NexiGo SPK03) as the audio output, and its built-in microphones (NexiGo SPK03) as the audio input in the settings of the app you’re using.
Press and hold the Mute button for about two seconds to enable or disable VoiceCap Mode. This function automatically eliminates surrounding noise, and only picks up and transmits sound within a five-foot radius. To create a clear and natural sound, the speaker volume automatically adjusts according to the surrounding noise.
Note: VoiceCap Mode is only recommended for use in open spaces. Please disable this function when in a controlled environment, such as a conference room or home office.
When the speakerphone is connected wirelessly and also by USB, tap the Signal button on the far left side of the speakerphone to switch between wireless and USB transmission.
The status light will glow blue for a wireless connection and white for a USB connection.
Bluetooth Connection

USB Connection


First, set a PIN. Then, update to the newest version of Windows 10 or 11 on your device. Finally, navigate to System Settings > Account > Sign-in options > Window Hello Face setup.
The privacy cover automatically reveals the camera when the webcam is engaged, and then automatically hides the camera when it's not in use. Alternatively, you can also tap the touch sensor on the webcam to manually activate the privacy cover.
The optimum distance from the webcam when using facial recognition is within 20 inches. However, facial recognition will work between 12.4 to 47.2 inches.
FAQ
The NexiGo webcam captures clear images and can record video at 1080p/60fps in a well-lit environment. The quality of the signal can be affected by low bandwidth availability or insufficient lighting. This can cause the frame rate to drop to 1080p/50fps, or possibly even lower.
Check the video output settings in your video capture software, these may be set to a lower capture format. There are various constraints on the system that could impede the ability to attain a 1080p video calling session. They center around processing power(i.e.CPU speed) and available network bandwidth. ln all cases, review the requirements from the video calling application. They will guide as to the system performance required as well as the necessary bandwidth.
The privacy cover was built-in the webcam. Slide the small knob located in the front of the webcam to left / right, and the privacy shutter will be opened / closed.

There are several reasons this could happen:
1. There is something wrong with the USB port. Please use a different USB port or another PC and test the camera again.
2. The PC does not recognize the camera device.
3. The operating system and computer configuration do not satisfy the requirements of the camera. Please check your system specifications.
4. The video preview feature of the application is not turned on, or the application has a privacy feature that prohibits access to the camera. Please try with a different application.
Unless you have issues with the camera, we don't recommend any firmware updates. If you are not sure about if updates are needed, please contact our customer support cs@nexigo.com.

Image Sensor
1/1.8" Sony® STARVIS 2 back-illuminated sensor
Resolution
(USB 3.0 Output)
MJPEG/H.264
3840 x 2160@30/25/20/15/10/5fps,
1920 x 1080@60/30/25/20/15/10/5fps,
1280 x 720@60/50/30/25/20/15/10/5fps, etc.
YUY2/NV12
1920 x 1080@60/50/30/25/20/15/10/5fps,
1280 x 720@60/50/30/25/20/15/10/5fps, etc.
Resolution
(HDMI Output)
30fps mode
3840 x 2160fps@30/25fps, 1920 x 1080@30/25fps
60fps mode
1920 x 1080@60/50fps, 1280 x 720@60/50fps
Lens
9-layer glass lens, f/2.2 aperture, 4.2 mm focal length
Field of View
D=90°/H=81°/V=55°
Focus Type
Fixed Focus
Focus Range
10" - 90" (0.25m - 2.28m)
Digital Zoom
Up to 10x digital zoom at 4K@30fps
Facial Enhancement
Support
Microphone
Dual noise reduction mics
Mic Pickup Range
Within 32.8ft (10m)
Video Output Port
1 x USB-B, 1 x HDMI
Software
Works with Zoom, Microsoft Teams, Skype for Business, Slack, Webex, and many more
Operating System
Windows 7 (Supports 1080p or lower),
Windows 8.1/10/11 or above
macOS 10.10 or above
Hardware
CPU: 2.4 GHz Intel Core 2 Duo processor or better
RAM: 2 GB or more
USB: USB 2.0, USB 3.0(Recommended)
Overview


1. FHD Lens
2. Power Indicator
3. Light Adjustment Touch Control Area
4. Flexible Clip / Base
5. Noise Reduction Microphones
6. 1/4" Tripod Screw Hole
7. Privacy Shutter
8. 3.5mm Audio Jack
9. Extra USB 2.0 Port
10. USB-C Port (Connect with computer)
Specification
video resolution
1920x1080@60fps, 1280x720@60fps, 640x480@60fps
Sensor
1/2.9-inch CMOS digital image sensor
Focus type
Autofocus
Field of view
D=78° / H=65° / V=39°
Application support
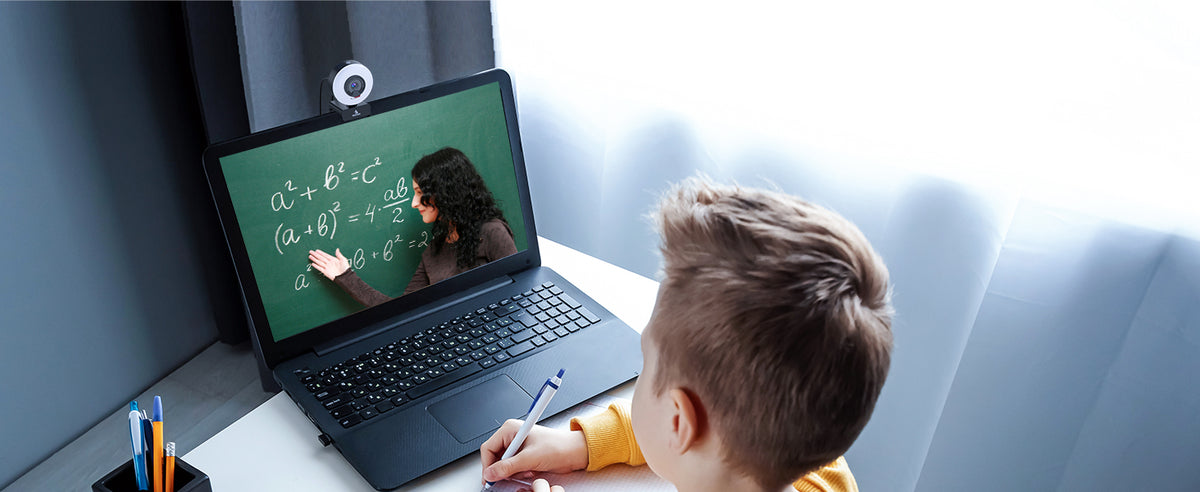
Chat software: Skype, FaceTime, Zoom, Microsoft Teams, Hangouts, etc.
Streaming software: Open Broadcaster Software and Xsplit
Photo or video: Using system Camera App (Camera for Windows, PhotoBooth for macOS)
System requirements
Windows 7 / 8 / 10 / 11 or above
macOS 10.6 or above
Chrome OS V29.01547 or above
How to set up Windows Hello face login?
Set up VideoNote:
- To use face recognition, you may need to first update to the newest version of Windows 10/11 using Windows Update.
- If Windows Hello will not work after performing all other steps, please double-check to make sure that all current updates have been downloaded.
- To set up Windows Hello facial recognition, you must first set a PIN.
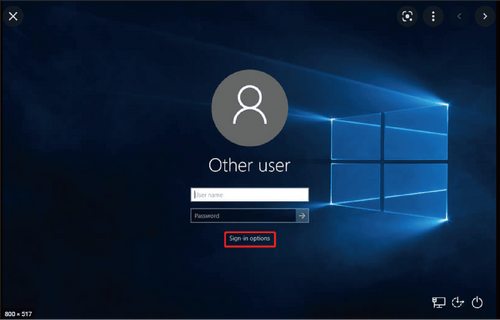
Step 1. On your computer, Select Start > Settings > Accounts > Sign-in options.

Step 2. Under Manage how you sign in to your device, click on Windows Hello Face and click on Set up.
"Windows Hello setup" will be displayed.

Step 3. Click on Get Started to start the facial recognition setup.

Step 4: Enter your PIN.

Step 5: Look straight into the camera while it scans your face.
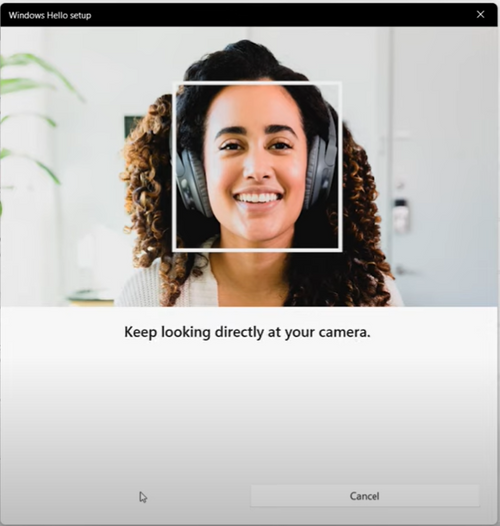
Step 6: Click Improve recognition to allow for additional scans, or Close to finish the setup process.
If you wear glasses, hats, or other accessories that may change your appearance, we recommend that you scan your face with and without them on.

Step 7: The next time you log in to Windows, the system will attempt to use the Windows Hello feature and the webcam to unlock the system. If this does not happen, please change the Sign-in options to Window Hello Face.