

Chapters
0:00 Introduction
0:10 Set up
0:49 Switch between different viewing modes
1:10 Mute the microphones
1:18 FAQ
Chapters
0:00 Introduction
0:10 Set up
0:49 Switch between different viewing modes
1:10 Mute the microphones
1:18 FAQ
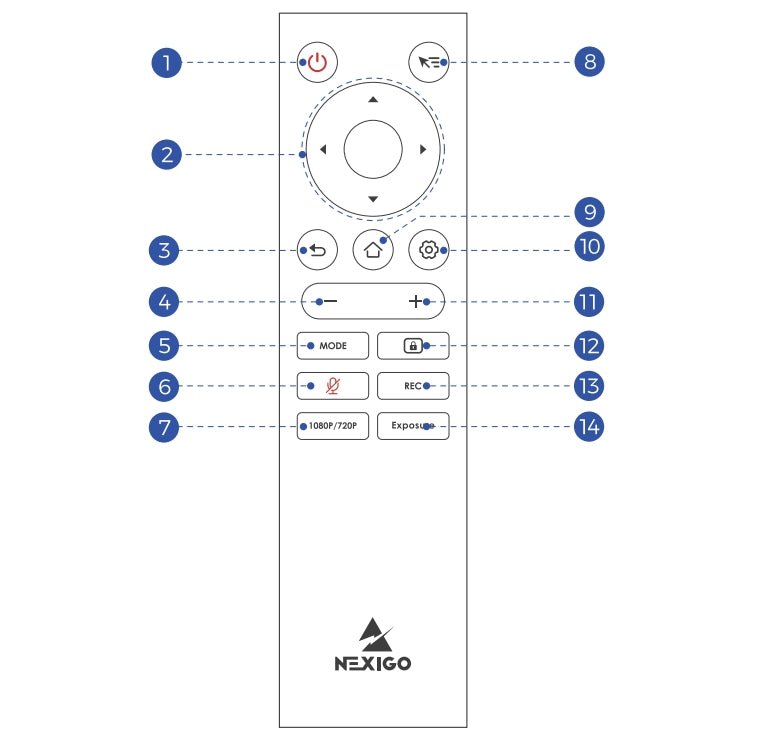
Note:
1. The remote control can only control the system in HDMI and USB Input Modes.
2. In USB Input Mode, only buttons labeled 2, 4, 5, 6, 11, and 12 are functional.
1. Power: Press to wake up or enter sleep mode.
2.Left/Right/Up/Down: Navigate through system page.
3.Return: Return to the previous page.
4.Volume Down: Decrease the volume.
5.Mode: Change the orientation that the camera uses todisplay meeting attendees.
6. Mute: Disable the microphone.
7.Resolution: Toggle between 1080p/720p resolution.
8. Air Mouse: Enable motion control.
9. Home: Return to the system home page.
10.Settings: Open the system settings page.
11.Volume Up: Increase the volume
12. Lock: Lock the active speaker frame to its current locationwhile in.
13.Record Video: Begin recording video to local storage.
14.Exposure: Adjust the image exposure.
15.OK: Open or confirm the highlighted item.
Note: Only use Ethernet LAN to connect multiple machines in series
The Meeting 360 is plug-and-play and does not require any specific software or drivers to be.
It does not support upside-down installation. It was designed to be used on the surface top. Conference tables are the perfect place.
It's voice tracking.
The Meeting 360 tracks active speakers and presents them accordingly. Active speakers refer to the person that continuously speaks over three seconds.