
Article Overview
Step 1: Open the Projection Calculator Pro ToolStep 2: Search for your projectorStep 3: Set the Image Size to the size of your projector screenStep 4: Place your projectorStep 5: Mark your screen locationStep 6: Hang your screenStep 7: Set up your projectorMeasuring for NexiGo UST Accessories
How To Measure for Your Projector Screen (This Amazing Tool Does All the Work for You!)
Amber Stefanson | Dec 29, 2023
Have you ever encountered this frustrating issue while setting up a new projector?
Your instruction manual tells you to set up your projector first so that you know where to hang your screen… but without your screen already up, you don’t know where to set up your projector. By following these instructions, you’re forced to eyeball the placement of your projector, then double check that it’s in the right place by holding up your projector screen. You’ll likely need to repeat this several times before you reach perfect alignment.
This process is so painful because you’re being instructed to solve a math problem without any numbers — when actually, if you have the numbers you can find the ideal locations for your projector and projector screen before you even take anything out of the box.
With some simple measurements and quick math, you can use the throw ratio of your projector to find the right distance to keep between your projector and your screen.
Or you can simplify the whole process with this amazing calculator tool on Projector Central.
With the Projection Calculator Pro tool, all you need to do is select your projector model and Projector Central will give you all the measurements you need to set up your projector and screen. No math required!
In this article, I’ll walk you through the process of using the Projection Calculator Pro tool to hang your projector screen. I’ll also give you some pointers on how to modify your measurements if you have the Sliding Tray or Lifting/Sliding Tray for the Aurora Pro.
Step 1: Open the Projection Calculator Pro Tool
Go to the Projection Calculator Pro tool. You can find this tool directly on the Projector Central website; no need to install anything.
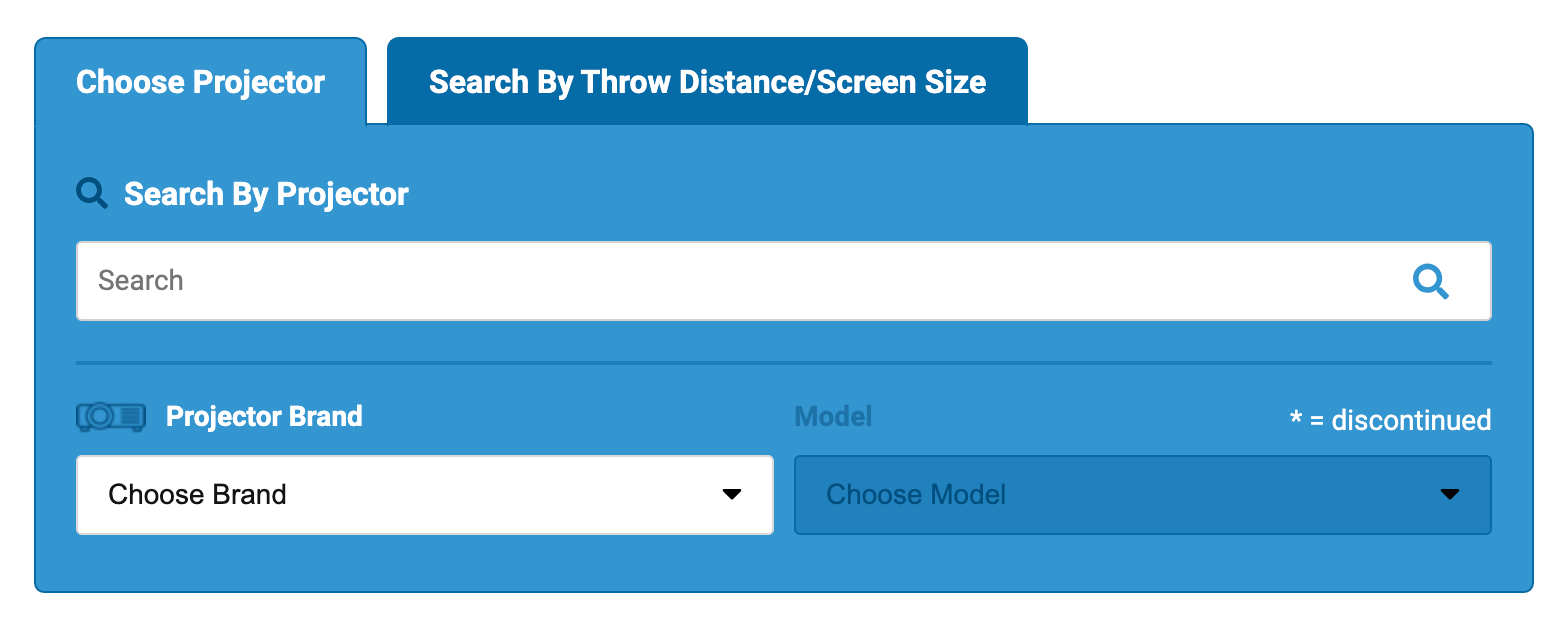
Step 2: Search for your projector
Open the Choose Projector tab. Type the brand and model of your projector into the search bar and select it from the dropdown menu.
Projector Central is really great about updating their tool with new projectors from every brand as they come out. They have calculations for all NexiGo projectors, even those that have been discontinued.

If you don’t have a projector yet, you can find one that’s the right size for your media room using the Search By Throw Distance/Screen Size tab.
Step 3: Set the Image Size to the size of your projector screen
Click and drag the slider under Image Size to input the size of your projector screen.
Make sure to indicate whether this measurement is the width, height, or diagonal. (If you’re using the measurement from your projector screen’s product listing or user manual, this measurement will most likely be diagonal!)

As you adjust the Image Size, Projector Central will automatically calculate the right throw distance.
Step 4: Place your projector
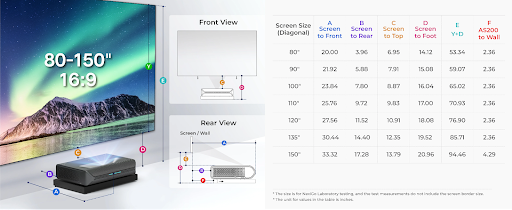
Use the measurements provided by Projector Central to measure the ideal location for your projector. Place your projector at a distance from the wall equal to the recommended Throw Distance. In the example below, the projector should be 1’ 8” (20” or 50.8 cm) from the wall to cast a 100” (254 cm) screen.

Before you continue, hold up your screen to make sure that your projection is level and properly sized.
Step 5: Mark your screen location
Set aside your screen and turn on your projector. Get a measuring tape and a pencil for marking your wall where you plan to hang your projector.
Mark the location of the mounting holes, referring to your user manual to find the measurements. If you’re using a NexiGo Fresnel Screen, refer to the following measurements.
NexiGo 100” Fresnel Screen
The following measurements are for the NexiGo 100” Fresnel Screen. You will need to mark and measure 2 points.

- Left Mark: Using the top left corner of the projection as your reference point, measure 6 ⅝” (16.9 cm) down and 22 ³⁄₁₆” (56.3 cm) in from the right. Mark this spot for the left mounting bracket.
- Right Mark: Using the top right corner of the projection as your reference point, measure 6 ⅝” (16.9 cm) down and 22 ⅛” (56.2 cm) in from the left. Mark this spot for the right mounting bracket.
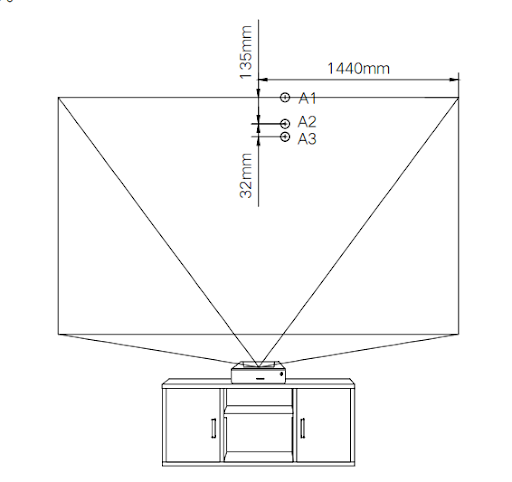
NexiGo 120” Fresnel Screen
TThe following measurements are for the NexiGo 120” Fresnel Screen. You will need to measure and mark a series of 7 points.
Use a pencil to mark 3 reference points, referring to the following measurements.
- Mark A1: Measure 17 ¹¹⁄₁₆” (144 cm) from the right edge of the projection and make a mark in that spot. This point is A1.
- Mark A2: From A1, measure 5 ⁵⁄₁₆” (13.5 cm) down to mark A2.
- Mark A3: Measure 1 ¼” (3.2 cm) down from A2 to mark A3.
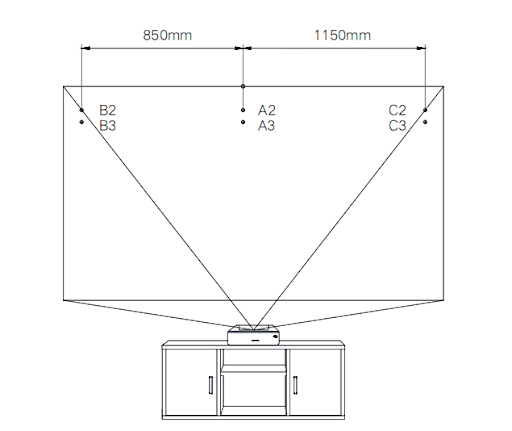
Using A2 and A3 as reference points, measure and mark the following mounting points.
- Mark B2: From A2, measure 33 ⁷⁄₁₆” (85 cm) to the left to mark B2.
- Mark B3: From A3, measure 33 ⁷⁄₁₆” (85 cm) to the left to mark B3.
- Mark C2: From A2, measure 45 ¼” (115 cm) to the right to mark C2.
- Mark C3: From A3, measure 45 ¼” (115 cm) to the right to mark C3.
Step 6: Hang your screen
Mount your screen to the wall, referring to the user manual that came with your screen for further instructions.
Make sure to turn off your projector to prevent the bright light from harming your eyes while you work. If your projector is an ultra-short throw, it may also be beneficial to move it away from the wall so that it doesn’t get dusty from drilling into the wall.
Step 7: Set up your projector
Set up your projector, using the measurements from the Projection Calculator Pro tool as needed. Make final adjustments to the Keystone, as needed. Refer to your user manual and our Aurora Pro setup video for further instruction.
Measuring for NexiGo UST Accessories
If you have one of our sliding/lifting trays for the Aurora Pro, you’ll need to modify your measurements from Projector Central.
With AS200 Sliding Tray
If you have the AS200 Sliding Tray, you can move the Aurora Pro up to 13” (33 cm) farther away from the wall when you activate the tray.
Make sure that you place both the tray and the projector where you intend to keep them before measuring for your screen. When placing the tray, you should choose a location that works best for you, subtracting up to 13” (33 cm) from Projector Central’s recommended throw distance.
Next, extend the tray until your projector is at a distance from the wall equal to Projector Central’s recommended throw distance.
If you need additional measurements to mount your screen alongside your AS200 tray, refer to the chart below.
With AS400 Lifting/Sliding Tray
If you have the AS400 Lifting/Sliding Tray, you can move the Aurora Pro up to 7 ⅞” (20 cm) farther away from the wall and up to 7” (17.8 cm) higher when you activate the tray.
Make sure that you place both the tray and the projector where you intend to keep them before measuring for your screen. When placing the tray, you should choose a location that works best for you, subtracting up to 7 ⅞” (20 cm) from Projector Central’s recommended throw distance.
Next, extend the tray until your projector is at a distance from the wall equal to Projector Central’s recommended throw distance. Raise the tray until it’s at your preferred height, then proceed to measure for your projector screen.
If you need additional measurements to mount your screen alongside your AS400 tray, refer to the chart below.

Continuing Setup
Thanks for reading! I hope this article was helpful in making the process of mounting your projector screen a little less stressful. I truly cannot recommend Projector Central enough for getting started with your new media room.
If you encounter any more confusion while setting up your projector, check out our YouTube channel for more instructional content. Catch you next time!
Like what we do? Stay tuned for more.
Whether you work at home or in the office, NexiGo provides a wide range of quality and affordable technology to elevate your daily life. Our products encompass everything from webcams and portable monitors to projectors and gaming accessories.
Articles we think you'll love