

Chapters:
0:00 - Intro
0:16 - Unboxing the P620
0:53 - Overview of ports
2:30 - Remote control tour
5:25 - First time setup
6:40 - Outro
Step 1. Make a Connection for the Camera
Method 1: Power via Wall Outlet
1. Plug in the camera using the provided Power Adapter and Power Cable.
2. Connect the camera to a computer using the provided USB 3.0 cable.
3. Toggle the power switch to turn the camera on.

Method 2: Power via PoE Router
1. Connect the camera to a PoE Router or Network Switch using an Ethernet Cable (not included).
2. Toggle the power switch to turn the camera on.

Note:
You must use a CAT6 or higher Ethernet Cable to ensure normal operation.
Make sure your Router or Network Switch supports PoE to power the camera through the Ethernet cable.
Step 2. Wait for Camera to Power Up
Once powered on, the power indicator on the front of the camera will light up. The camera will then begin its initialization process, moving to the outer limits of its range of motion before centering in a neutral position.
- Once the camera has completed its initialization, it will stop moving and begin receiving commands.
- lf preset 0 has been set, the camera will move to preset 0.

Setting the Camera Frequency:
To set the camera frequency to one of your remote channels, hold the remote close to your camera and press the following sequence of buttons. Note that you can only control the camera(s) on the channel that your remote is currently set to.
【*】>【#】>【I】: Press these three buttons in sequence to set the camera
frequency to No.1.
【*】>【#】>【II】: Press these three buttons in sequence to set the camera
frequency to No.2.
【*】>【#】>【III】: Press these three buttons in sequence to set the
camera frequency to No.3.
【*】>【#】>【IV】: Press these three buttons in sequence to set the
camera frequency to No.4
Switching Between Remote Channels:
Press and hold one of the numbered buttons for four seconds (I, II, III, or IV)
to switch between camera channels. The red indicator light will start
blinking rapidly. Once the blinking slows, the remote can now control the
camera at the corresponding frequency.
【I】: Press and hold for at least four seconds to switch the remote channel
to No.1.
【II】: Press and hold for at least four seconds to switch the remote
channel to No.2.
【III】: Press and hold for at least four seconds to switch the remote
channel to No.3.
【IV】: Press and hold for at least four seconds to switch the remote
channel to No.4.
1. Indicator Light: A red indicator light will flash each time youpress a button
2. Power Button: Press the red power button to turn thewebcam on or off
3. Menu Button: Press the menu button once to open or close the on-screen display(OSD) menu.
4. View Mode Button: Press to switch between the available viewing modes
5. Information Button: Outside of the OSD menu, you can press this button once to display the IP address and HDMI output format.
6. Auto Tracking/Far Focus Button: Press once to enable or disable the auto tracking function or select a tracking target
7. Auto Framing/Near Focus Button: Press once to enable or disable the auto framing function
8. Zoom + / - Buttons: Press to zoom in (+) or out (-) on the video
9. Arrow Buttons: Press when the video is zoomed in to pan or tilt the camera view
10. Home Button: Press to reset the video capture view to the default position
11. Preset Button: Set a preset
12. Mute Button: Press to mute or unmute the webcam’s microphone
13. Auto/Manual Focus Switch Button: Press to switch between the auto focus mode and manual focus mode
14. Numbered Buttons (0-6, I-IV): Press one of the digits (0-6, I-IV) to set and recall preset positions.
Press one of the numerals (I-IV) to set a remote control or camera address
for a multi-cam setup.
1. Check Your Equipment
- Make sure the P620 camera is connected to the network using a CAT6 or higher Ethernet cable.
- Ensure that the connected Router or Network Switch supports PoE (Power over Ethernet).
2. Check Your Network
- Confirm that the camera is on the same network as any devices connecting to the camera.
3. Reset IP Address
- Open the camera's OSD (On-Screen Display) menu.
- Navigate to Network > Connection and switch DHCP to On to get a new IP address for the camera.
- Enter the new IP address into the address bar in your web browser.
- Use "admin" as both the username and password to access the camera.
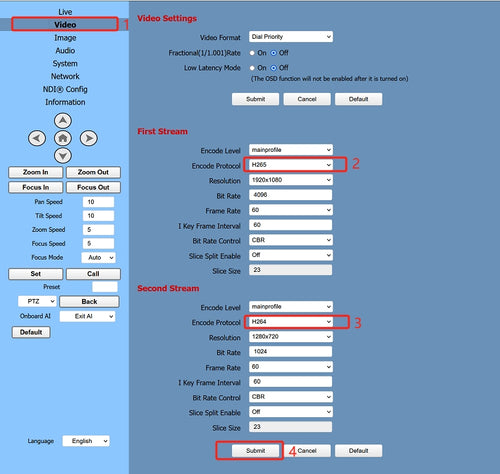
1. If Only Ethernet Connection Is Active:
- Navigate to the Video tab
- Set the Encode Protocol of the First Stream to H264.
- Set the Encode Protocol of the Second Stream to H264.

2. If USB and Ethernet Connection Are Both Active:
- Navigate to the Video tab
- Set the Encode Protocol of the First Stream to H265.
- Set the Encode Protocol of the Second Stream to H264.
- Launch OBS Studio on your computer, click "+" under the Sources menu at the bottom of the page, and select "Media Source".
- Select "Create new", click "OK", and on the next page Deselect "Local File"
- In the "Input" field, enter "rtsp://" followed by the IP address of your camera, followed by "/1" (e.g., "rtsp://192.168.100.88/1").
- Click OK to save the settings. The live feed from the camera should now appear on screen.
- Establish a Wired Network Connection for the Camera
- Access the Camera via IP Address
- Send the MAC address and Device Serial Number to the NexiGo Team.
- Activate the NDI License
- Download and Install NDI Tools
- Connect NDI Sources
Click
Method 1: Press the Menu button and navigate to Setup to flip your image.
Method 2: Flip your image in video conferencing or virtual camera software such as Zoom or OBS.
1. Check that the camera is stable and installed in a location with no more than a 15° incline.
2. Ensure that there is no vibrating machinery near the camera.
1. Install the VLC plug-in. This software is required in Internet Explorer due to HTML 5 restrictions.
2. Download and install the 32-bit VLC media player at the VLC website (http://www.videolan.org/vlc).
3. After it's installed, the video feed from the camera should display normally.
4. Other mainstream browsers that already support HTML5 do not require the VLC plug-in to display video from the P620 camera. Compatible browsers include Microsoft Edge, Google Chrome, and Safari.
1. Check whether the camera protocol, address, and baud rate all match.
2. Check that all cables are firmly plugged in.
Unless you have issues with the camera, we don't recommend any firmware updates. If you are not sure about if updates are needed, please contact our customer support cs@nexigo.com.

Image Sensor
1/1.8" Sony® STARVIS 2 back-illuminated sensor
Resolution
(USB 3.0 Output)
MJPEG/H.264
3840 x 2160@30/25/20/15/10/5fps,
1920 x 1080@60/30/25/20/15/10/5fps,
1280 x 720@60/50/30/25/20/15/10/5fps, etc.
YUY2/NV12
1920 x 1080@60/50/30/25/20/15/10/5fps,
1280 x 720@60/50/30/25/20/15/10/5fps, etc.
Resolution
(HDMI Output)
30fps mode
3840 x 2160fps@30/25fps, 1920 x 1080@30/25fps
60fps mode
1920 x 1080@60/50fps, 1280 x 720@60/50fps
Lens
9-layer glass lens, f/2.2 aperture, 4.2 mm focal length
Field of View
D=90°/H=81°/V=55°
Focus Type
Fixed Focus
Focus Range
10" - 90" (0.25m - 2.28m)
Digital Zoom
Up to 10x digital zoom at 4K@30fps
Facial Enhancement
Support
Microphone
Dual noise reduction mics
Mic Pickup Range
Within 32.8ft (10m)
Video Output Port
1 x USB-B, 1 x HDMI
Software
Works with Zoom, Microsoft Teams, Skype for Business, Slack, Webex, and many more
Operating System
Windows 7 (Supports 1080p or lower),
Windows 8.1/10/11 or above
macOS 10.10 or above
Hardware
CPU: 2.4 GHz Intel Core 2 Duo processor or better
RAM: 2 GB or more
USB: USB 2.0, USB 3.0(Recommended)
LINE IN Interface
3.5mm Audio Interface
LINE OUT Interface
3.5mm Audio Interface
RS485
2-pin phoenix port, Max Distance: 4000ft (1200m), Protocol: VISCA / Pelco-D / Pelco-P
RS232 IN
8-pin mini-DIN, Max Distance: 100ft (30m), Protocol: VISCA / Pelco-D / Pelco-P
RS232 OUT
8-pin mini-DIN, Max Distance: 100ft (30m), Protocol: VISCA network use only
Network Interface
LAN: 10Mbps / 100Mbps adaptive Ethernet port, PoE supported
HDMI Interface
Version 1.3
3G-SDI Interface
BNC Type, 800mVp-p, 75Ω. Along with SMPTE 424M Standard
USB Interface
USB-A 3.0
Power Input Interface
JEITA Type (DC IN 12V)
Signal System
1920 x 1080/60p, 1920 x 1080/59.94p, 1920 x 1080/50p, 1920 x 1080/60i, 1920 x 1080/59.94i, 1920 x 1080/50i, 1920 x 1080/30p, 1920 x 1080/29.97p, 1920 x 1080/25p, 1280 x 720/60p, 1280 x 720/59.94p, 1280 x 720/50p