00:00 - Intro
01:24 - Controls Overview
02:02 - On-Board Controls
02:46 - USB Setup
03:14 - HDMI Setup
04:00 - Ethernet Setup
04:42 - Multicam Setup
05:24 - Outro

Note:
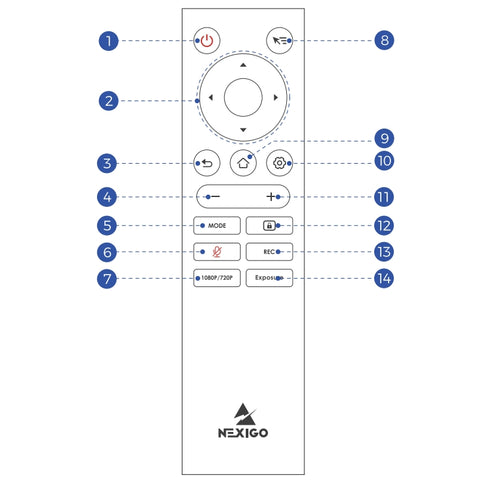
1. The remote control can only control the system in HDMI and USB Input Modes.
2. In USB Input Mode, only buttons labeled 2, 4, 5, 6, 11, and 12 are functional.
1. Power: Press to wake up or enter sleep mode.
2.Left/Right/Up/Down: Navigate through system page.
3.Return: Return to the previous page.
4.Volume Down: Decrease the volume.
5.Mode: Change the orientation that the camera uses todisplay meeting attendees.
6. Mute: Disable the microphone.
7.Resolution: Toggle between 1080p/720p resolution.
8. Air Mouse: Enable motion control.
9. Home: Return to the system home page.
10.Settings: Open the system settings page.
11.Volume Up: Increase the volume
12. Lock: Lock the active speaker frame to its current locationwhile in.
13.Record Video: Begin recording video to local storage.
14.Exposure: Adjust the image exposure.
15.OK: Open or confirm the highlighted item.
Note: Only use Ethernet LAN to connect multiple machines in series
The security requirements of Google Meet enterprise accounts cause this issue. A PIN code must be set on the device before Google Meet can be used.
Please set a PIN code, restart the device, and then try opening Google Meet again.
How to set a PIN code
Before setting a PIN, make sure the camera is properly set up in HDMI Mode.
Step 1: Set up the camera


Step 2: Set the PIN code


How to delete or change the PIN?

Press and hold the OK and Volume Down Button for at least 5 seconds simultaneously until the indicator stops flashing to pair the remote with the camera.
(Note: Ensure that you point the remote toward the camera)
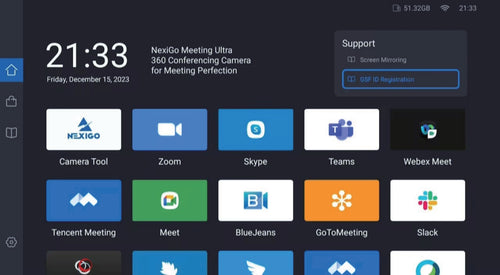
1. Go the Home > GSF ID Registration.

2. Follow the on-screen instructions to finish registering your device. After submitting your GSF ID form, Google will review the application. This process may take up to 2 business days.
3. When your registration is approved, reboot the NexiGo Meeting 360 Ultra to begin using the App Store.
Chapters
00:00 - Intro
01:24 - Controls Overview
02:02 - On-Board Controls
02:46 - USB Setup
03:14 - HDMI Setup
04:00 - Ethernet Setup
04:42 - Multicam Setup
05:24 - Outro

Note:
1. The remote control can only control the system in HDMI and USB Input Modes.
2. In USB Input Mode, only buttons labeled 2, 4, 5, 6, 11, and 12 are functional.
1. Power: Press to wake up or enter sleep mode.
2.Left/Right/Up/Down: Navigate through system page.
3.Return: Return to the previous page.
4.Volume Down: Decrease the volume.
5.Mode: Change the orientation that the camera uses todisplay meeting attendees.
6. Mute: Disable the microphone.
7.Resolution: Toggle between 1080p/720p resolution.
8. Air Mouse: Enable motion control.
9. Home: Return to the system home page.
10.Settings: Open the system settings page.
11.Volume Up: Increase the volume
12. Lock: Lock the active speaker frame to its current locationwhile in.
13.Record Video: Begin recording video to local storage.
14.Exposure: Adjust the image exposure.
15.OK: Open or confirm the highlighted item.
Note: Only use Ethernet LAN to connect multiple machines in series
Press and hold the OK and Volume Down Button for at least 5 seconds simultaneously until the indicator stops flashing to pair the remote with the camera.
(Note: Ensure that you point the remote toward the camera)
1. Go the Home > GSF ID Registration.

2. Follow the on-screen instructions to finish registering your device. After submitting your GSF ID form, Google will review the application. This process may take up to 2 business days.
3. When your registration is approved, reboot the NexiGo Meeting 360 Ultra to begin using the App Store.